Sunday, September 15, 2013

How Many Times Did I Pin THAT????

Anyone else pin the same item time and time again?  Evidently I must really want to make Boston Cream Pie Cupcakes!  I guess this means it is time for a massive board cleaning project!  Good news is that as I clean the boards I will get more recipes that I've tried up on the blog and then I can delete them from my Pinterest Board that is called Recipes to Try... LOL.  I really should change the board name to things that look YUMMY until I see the ingredients and realize I don't like half of them and the husband doesn't like the other half!  Seriously, Black Beans have been a hot topic in our house these past few weeks... Up until now I have refrained from putting them on or in anything because I thought I didn't like them... guess I was mistaken (notice I didn't say wrong)... I like them and I like them A LOT! So now I want to put them in everything because they are good protein and the husband just says NO... BOO Husband BOO!  I might have to start a puree trend in our house until he succumbs to the "Black Beans Reign Supreme" way of thinking! Ah but I digress... ANYWAY... I've got a cool little recipe that is basically spaghetti without making it look or sound like spaghetti... GENIUS!

RIGATONI PASTA PIE
Now I have seen this all over Pinterest and I believe the original recipe may have come from the Noble Pig and she gives credit to Martha Stewart... but I didn't use the exact ingredients nor did I get the same results.  I love the idea of no processed food or as little as possible but with two young children and a hungry husband sometimes I have to pick my battles... so here is my very simple but highly requested take on this recipe.

Ingredients
1 Jar of My Favorite Store Bought Spaghetti Sauce
1 Box of Rigatoni Noodles, cooked, drained and tossed with the Olive Oil below
1 lb of lean ground beef, seasoned, cooked and drained
1 Tbls Olive Oil
1 cup mozzarella
1 cup Parmesan (honestly, I've been known to use the stuff that comes in a container ... seriously)

Directions
Ready, here we go...
First I just cook the hamburger... I try to break up the meat into very small pieces as I am cooking because it makes it easier to "stuff" the rigatoni later on! While I am cooking the meat I put on a pot of water to boil so that I can cook my Rigatoni... 

Second, Once the water starts to boil I put in my box of rigatoni and set my stove timer for one minute less than the box tells me... why... well because I have been told that if you are going to cook pasta and then bake it that you should cook it for one minute less than the box says so that the noodles don't get too mushy.  I know they are noodles and they are supposed to be soft but you know... yeah, you know that if you go too far with the cooking that the texture is just UGH... YUCK!  

Third, While your noodles are cooking and you have finished cooking the meat and drained it, add your spaghetti sauce to the hamburger and then set it aside for a moment.  

Fourth, Now when your noodles are done, drain them and then toss them with the olive oil.  Once that is done dump in the Parmesan.  Stir that up, now here comes the fun part!  

Fifth, Get out your Spring Form Pan, spray it with a little non-stick spray and then turn it on its side and start stacking... I tried to do this multiple ways but honestly stacking it while the pan is on its side is the easiest and it doesn't take as long as one might think! Make sure you pack them in there tightly, at some point you can put the pan down flat and continue stuffing and everything will be just fine... Just make sure you are comfortable with what you are doing and you don't have noodles sliding out of the pan and what not...

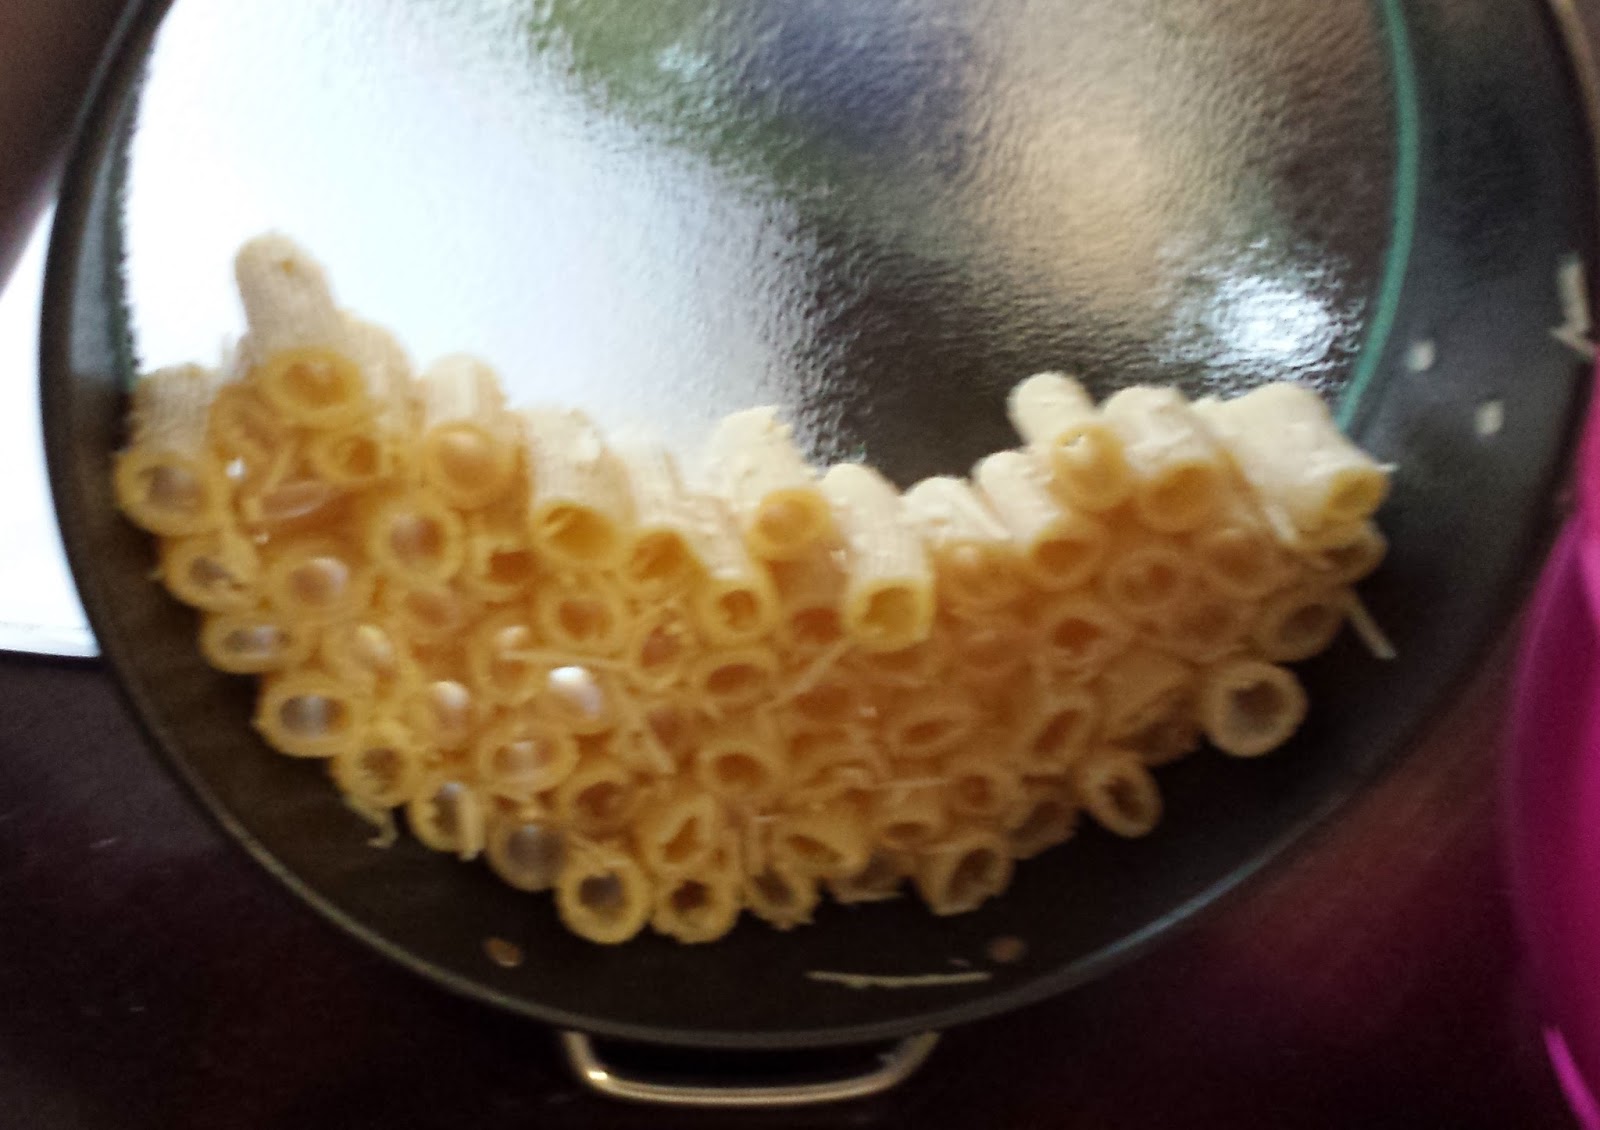
Sixth, Pour your hamburger/sauce mix over the noodles.  Using a spatula push the hamburger and sauce into the rigatoni "stuffing" the noodle.

Seventh, top it all off with your mozzarella cheese. 

Finally, Slide the pan into the oven at 400 degrees Fahrenheit for 15 minutes.  

I don't recall having to use a knife to loosen the sides before popping the spring form pan open but it never hurts to do it and error on the side of caution!

NOW... I have to tell you the first time we made this I just used the spring form pan bottom as the serving plate... BIG MISTAKE.  I had "juice" all over my table.  So the second time I made it I put it on one of my cake serving plates that I made! I have one in orange, yellow and green (super easy to make).  Maybe I will do a small tutorial on that eventually!  Depends... I don't remember if I took pictures or not when I was making them... ANYWAYS... enjoy a fast, unique meal!
 

Tuesday, July 30, 2013

Home Made Runza's

Here in the Midwest we enjoy a wonderful little fast food restaurant called Runza.  I love their hamburgers and fries.  My husband loves the namesake... Runza's!  Last time we were enjoying our yummy treats from Runza, my husband mentioned that we should try to make the Runza's from scratch.  Which really meant, I should find a recipe so he can have them more often!  Oh well, the things a girl does for her family.  I searched the web and I found a recipe at Christephi's Sprouting Flowers. I changed it up a little but I tried to follow the original recipe pretty closely.


In looking for a recipe I found out that this dish originated in Russia and then spread to Germany before coming to the United States in the 1800's the dish was called bierock, fleischkuche or kraut pirok.  Enough of the history lesson now onto the recipe!

Filling Ingredients
8 stalks chopped green onions
4 shredded garlic cloves
2 lbs ground beef
12 medium sliced mushrooms
1 head of cabbage chopped
2 small pouches of sauerkraut with juice (I found them at Hy-Vee in the dairy case but a small can of sauerkraut would work as well)
choice of seasoning for the hamburger
cheese of your choice (I used Swiss singles cut in half)

Dough Ingredients
1/2 cup shortening
1 pkg quick rise yeast
1 cup warm water
1 cup warm milk
1/2 cup sugar
1 TBL salt
2 beaten eggs
7 cups of flour

Directions
THE NIGHT BEFORE

Cook the hamburger with the green onions, garlic and seasoning (to shred the garlic I used a micro plane). Once it is done I drain the meat mixture.  I put a bowl under the colander and let the meat sit while I prepared the rest of the ingredients for the crock pot (a friend of mine told me to make sure I drained everything really well because if you don't the dough doesn't cook well and it is all a big mess).  I then chopped the cabbage, I cut mine with a lettuce knife in long thin strips.  I put them in the crock pot.  Then I cleaned the mushrooms with a wet paper towel (I've heard that if you run them under water it makes them rubbery). I sliced them a little thicker than I would have for a salad just because I knew they would cook down a whole bunch.  I opened the two small pouches of sauerkraut and put that in the crock pot with everything else.  Including the juice.  I know I just got done saying to make sure it is well drained but in this case... put the juice in, it provides flavor for all of that cabbage that you just put in the crock pot.  Then add the meat mixture and mix it all up.  Put the lid on and set the crock pot on warm. 

NOTE: The reason I put it on warm is that I let it sit that way all night long.  I cannot tell you what would happen if you put it on low or high because there is very little liquid in the crock pot at this point.  My guess is that it would scorch or burn the cabbage.

3 HOURS BEFORE DINNER (I say 3 hours because it takes a bit to get this all done and then it has to sit, once that is done it takes time and patience to roll out and put together each little yummy bun of goodness)
Combine the shortening, quick rise yeast, warm water and warm milk in a bowl.  Let it sit.  I just used a large measuring cup put the milk and water in it, heated it in the microwave and then added the yeast and shortening.  Set it aside.  I used a stand mixer with dough hooks for the next part.  Mix together the sugar, salt and eggs.  Then slowly incorporate the yeast mixture.  I added flour 2 cups at a time, stirring well after each addition.  If the dough becomes too stiff to stir, you can finish incorporating the flour by hand however, with dough hooks and a stand mixer I didn't have this problem.  The dough should end up being smooth and elastic.  Let the dough rest covered in a bowl for 1 hour.  The original directions said that the dough should double in size however, mine didn't but I moved forward without any issues.


I should have taken more pictures while I was making them but I didn't so here goes the instructions for making these...

Now is a good time to pre-heat your oven to 350 degrees F.  I drained the crock pot mixture, I pulled out the Swiss cheese and cut them in half. Then I just started making balls of dough, I made mine a little bigger than a golf ball.  If you have a pastry mat I would highly recommend using that but since I am pretty sure mine is still packed from moving I had to use wax paper, which worked fine (a little sticky though but it worked). 

Roll out your dough ball, place a slice of cheese and a scoop of filling, then you just pinch of the sides and then I folded over the end pieces and placed them on a greased cookie sheet. Put them in the oven and bake them for 30 minutes.  Now I did check mine at 20 minutes and decided that it needed the full 30 minutes.  They were quite yummy and the husband is already thinking of ways to make them even better next time, I on the other hand am thinking about different fillings!
Enjoy!

Thursday, May 9, 2013

Where Have I Been

Alright, this is just wrong!  I have lived here most of my life and I just found the International Bakery!  It is in a part of town called Little Mexico but the drive is well worth experiencing this little gem of a place! I was so excited when I found it, I neglected to take pictures.  So I found some online (photo credits are below the pictures).
Photo by Captain Napkin
How did this little excursion start?  Well have you seen the I-Hop commercial for the Brioche French Toast?  Well I have, which lead me to have lunch there with my oldest daughter one day and I tried the Banana Foster French Toast... YUMMY. Which got me to thinking, you know I really enjoy Brioche bread.  I've never seen any at my local grocery store but there has to be a bakery that sells the bread.  So I Googled... which lead me to this little bakery.  The only thing I could really find was a simple Facebook page and some reader comments on Yelp so I decided to go in search of this bakery - Plus I remembered a good friend of mine talking about this place one night after volleyball, (Yes this the way my mind works)! Now first off I didn't find a whole loaf of Brioche bread but what I did find was absolutely incredible.

If you are like me I get a little nervous about going to places I have never been before and even a little more nervous when it is in an area that I don't frequent.  I am a creature of habit, and I find comfort in my habits.  Now normally in this situation I would bring someone along with me but the husband was at work, as well as my sister and most of my friends.  So if I wanted to explore this place today I had to go alone, so I did and I was fine!  As I opened my car door I immediately could smell the aroma of the bakery, cinnamon, recently baked cake, frosting... mmmmm. 

From reading the reviews on Yelp I knew that I would need to grab a tray and some tongs and walk around selecting goodies!  I never expected what I found behind that door!
Photo by Captain Napkin
One very long row of pastry cabinets!  Every cabinet had a different kind of pastry and I was seriously trying hard to contain my excitement.  Then I saw the prices and I couldn't believe it, ALMOST everything was $0.50 and a few $1.00 items! Some were even 3 for $1.00.  Honestly, trying hard to contain myself at this point!


Photo by Captain Napkin
 Racks upon racks of fresh baked doughnuts, bread and bakery cases full of yummy goodness.  Oh and a little café too! Just amazing!

Photo by Captain Napkin
I had to show to the photo above because while I didn't get a whole loaf of Brioche Bread... yeah I know you see it.  See the long piece of bread that looks like it is pound cake on the left?  Well it isn't pound cake it is a thick slice of brioche bread with butter and sprinkled with very fine sugar.  NO it didn't make it home, it didn't even make it to 42nd and Q!

Photo by ME!
This is what actually made it home along with two croissants and a small loaf of bread!  I spent a total of $9.00!  I can't wait until dessert time this evening! 

Wednesday, May 1, 2013

Chili & Cornbread Waffles

YES! Cornbread Waffles!  I love Chili and Cornbread, who doesn't?  During the colder months we have it at least once a week for dinner.  The kids and husband get a little tired of the same old Chili and Cornbread routine.  So I was looking for a way to make it just a little bit more fun for them.  I had read somewhere that you could use chocolate cake mix and make chocolate waffles so I figured why not give it a try.  I just mixed up the cornbread mix like normal and poured it on the waffle iron!  PERFECT!

 
It was such a big hit my kids had three helpings!

Tuesday, April 23, 2013

Saving My Drink!

We all know it... we should drink more water!  I have a couple of requirements for my water.  First it must be as cold as possible (thank goodness for my ice maker) and second it must taste like anything BUT water!  I try to stay away from bottled flavor water because just as soon as I found one I liked... yep stories start to surface that they aren't good for you.  Most have added sugar, preservatives, etc.  So I turned to flavoring my water with fruit, herbs and veggies.  Sounds like a good alternative, right?  Well for me I found that time was an issue.  I have tried the Flat Belly Diet and I knew I liked, what they call "Sassy Water", I just call it yummy!  Which involves water, cucumber, lemon, mint and fresh ginger root.  My issue was that I would forget to make it or didn't have time to make it or I'd make it and then not drink the whole thing.  OR the other would happen and I would have the ingredients and before I would get to making it, my mint would go bad or my cucumbers would get soft... just not appetizing things to put in your water to drink... NOPE!

Then I remembered a post at Organic Gardening about saving fresh herbs from the farmers market!  I spend a small fortune on them and I get really frustrated when they go bad due to my lack of use or timeliness!  Now I had an idea... why can't I freeze my flavored water ingredients?

I knew I needed some ice cube trays so I headed to the stores to find some that would work.  I knew I wanted something that was big enough to fit the ingredients in but small enough so that it would melt quickly and give my water that flavoring that I love!  I went to Big Lots and found these trays for $2 a piece.  The bottoms are a rubber material and my thought was that it would be easier so pop them out once they were frozen.  Now $4 may seem like a lot for ice cube trays but I figured that I would earn my money back by simply not purchasing 4 drinks from the gas station.  Have I mentioned that I stop at one every morning?
I grabbed my ingredients lemon, cucumber, and mint. I cut each one small enough to fit into he trays and I started to fill them up. Once they were full I added water and slid them into the freezer.  The anticipation was almost too much to handle but thankfully I made it through!

While I was waiting I stressed about the ingredients being too delicate to handle the freezing process and what if it didn't turn out the way I had envisioned.  UGH the agony of it all, to keep my mind off of it I started cleaning.  Which if you know me... you know it isn't something I like to do, do often enough or find any sort of satisfaction from doing.  Nope that is why I have a husband and kids!

Finally these little babies where frozen and ready to be used.  I was pretty pleased that the ingredients appear to have made it through the freezing process but I still didn't know if the drink would taste the same.  The only way to figure that out was to actually make myself a drink! I popped those beauties out of the ice cube tray and into a bowl.  Then I added them to my water bottle (which I got a home goods for $4), filled it with water and waited a few minutes. Sip 1... mmmm I could taste every single ingredient... FABULOUS!
When I first did this little experiment I just plopped the ice cubes in the bottom which is fine for the cucumbers and lemon but the mint ended up coming up the straw periodically.  UHM not my intention.  I found filling the bottom with a little ice then the flavor cubes and more ice keeps the ingredients in the middle of the bottle.  I've also found that my husband likes to use some of my flavor ice cubes in his water... so I make extra lemon ice for him and that way we all end up drinking more water!

Monday, March 18, 2013

Easter Tree for Pennies!

Well I am in full Easter decorating mode... I found this Egg Topiary Tree on Pinterest.  So I decided to head to the Dollar Tree and find my supplies! Now from the tutorial above I expected the cone and eggs to be much bigger but they were fairly small.
The cone is 6 15/16 x 2 15/16 and the eggs are about an inch to an inch and a half in size.  While they had all different types of grass, I picked up paper grass.  First I opened the eggs and cut off the ribbon.  I used almost 4 bags of eggs I had three left over.  I simply started at the bottom applied a little hot glue and adhered it to the tree.
I put all of the eggs on first and then I went back and added grass to fill in the holes.
I also found some eggs on a stick!  These were also $1.00 a package and I purchased 2 packages.  I also found some glasses that had this cool indent on it that are oval... kind of looked like eggs to me! Anyway they were $1.00 ask well.  The only altering I did was I cut the sticks a little bit so that some were tall, some were short and some were in between.
$11.00 later, I've got some pretty nice little decorations!


Sunday, March 17, 2013

LOST DOG


LOST DOG

HAVE YOU SEEN ME?


I snuck out of the house on Friday, March 15th around 5:30pm. 168th & Blondo area.

My name is Griffin, I have a thyroid condition and need medication!

I am very smart, and am shy around people I don’t know. 

Please contact my owners:

Email lostdog912@gmail.com

I am happy to report that Griffin has been returned to us safe and sound!